


Welcome to the fourth installment of our blog series “Introduction to EHS Risks,” in which we’ll talk about the ways that a tool called risk bowtie analysis can help you improve your management and communication of EHS risks. In case you missed our previous posts in this series, take a little time to check out our first installment for an overview of EHS risks, our second installment for an introduction to the benefits of using a risk matrix, and our third installment for a discussion of the reasons why selection and management of risk controls are central to your job as an EHS professional.
Now, let’s talk about risk bowties and why they’re an ideal tool for assessing operational risks, and helping your employees better understand their roles in promoting workplace safety.
An Overview of Risk Assessment Methods
First, let’s review some background about EHS risks.
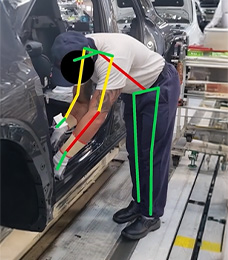
In our first installment of this series, we made the case that everything you do as an EHS professional involves identifying and controlling risks, and that development of your risk management skills is central to your job effectiveness. But we also talked about the fact that one of your challenges is that you have many different sources of risk (aka, hazards) in your workplace, consisting of hazards you can see, like chemicals, as well as hazards that are less visible but just as real and may require more digging to uncover, like insufficient employee awareness of hazards.
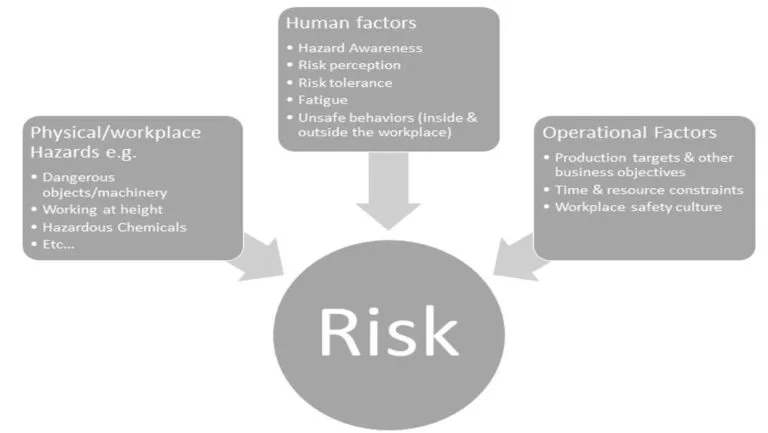
Major categories of hazards are shown in the diagram below.
Since it’s your job as an EHS professional to identify and control risks, and since you have many sources of risk to contend with, you need to learn good ways to evaluate risks. A process for systematically evaluating risks is called a risk assessment.
There are many specific ways of doing a risk assessment, and as an EHS professional you’re likely to explore at least a few of them. Here is a survey of just some of the methods commonly used:
Failure Mode, Effects & Criticality Analysis (FMECA): A quantitative failure analysis method that shows linkages between potential failures (failure modes) and consequences, as well as the relationship between the probability of different failure modes and the severity of outcomes.
Fault Tree Analysis: A top-down analytical method that shows an unplanned event at the top, and all the independent contributing events below it, which are themselves broken down into distinct causes.
Event Tree Analysis: An analysis showing all the possible consequences of an unplanned event, or loss of control, including estimated probabilities of different outcomes. For more information about both fault trees analysis and event trees analysis, check out our blog.
Five Whys: A method of identifying a root cause by asking why it happened, then by asking why that happened in a series of five questions, each time going deeper than the time before. Check out our blog for more information about the Five Whys method.
Hazard Identification Study (HAZID): A method of breaking down workplace processes to identify hazards and controls, and to assess the effectiveness of controls at reducing risk.
Hazard and Operability Study (HAZOP): A systematic assessment method that breaks down an existing process to looks for places where deviations from original plans occurred.
These different methods have their strengths and limitations, and which ones you’ll use depend partly on preference, and partly on what you’re trying to accomplish. For example, a HAZOP is a good method to use for a thorough assessment of complicated processes, like a chemical manufacturing operation. Both the number and significance of risks in that case call for a very structured evaluation of the operation in all its details. You would want to look with a careful eye on all the places something can deviate from normal operations, and the controls you have in place to reduce their chance of happening or their potential impact. On the other hand, if you’ve recently started a role as an EHS manager at a new facility and you’re trying to understand how to even get started addressing risk, a HAZID can give you the broad strokes you need to paint a general picture.
These methods also work well together. A common strategy is to conduct a HAZID first, as both a stopgap and preparatory method for conducting a HAZOP, which supplements our initial HAZID by accounting for risk controls. A HAZID helps get you going, so you can start mitigating the biggest risks.
As an EHS Professional, you’ll want a number of these methods at your service. That’s going to be easier to do if you have agile Operational Risk software that supports a number of common risk assessment formats and gives you the tools to do them right every time.
What are Risk Bowties?
Even though all types of risk assessments discussed above are useful, the collective limitations of using so many methods are that it’s harder to view risk holistically. Think about it this way: You have separate documents for each type of assessment, all with the information formatted in a different way. It takes work to dig through all those documents and assessments and synthesize a comprehensible view of risk that you can share with everyone in your workplace.
Luckily, there’s a tool called risk bowtie analysis that synthesizes information from all of your risk assessments into a single, easily understood diagram.
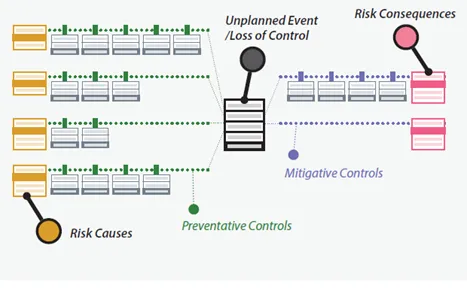
As you can see above, a bowtie pulls together all the relevant information about possible accidents into one place, where it’s easier to review and comprehend. You don’t have to hunt through multiple documents and types of assessments and then try to assemble the big picture, because bowtie analysis creates the big picture for you.
On the left side of the diagram, we see the causes of an accident, and on the right side we see the potential consequences. Preventative controls are methods we use to keep the unwanted event from happening in the first place, which is also why, in the diagram, another term we use for the accident is a “loss of control” – our controls to prevent the accident have literally failed. Mitigative controls are methods to reduce the impact if the accident happens. For a review of how to most effectively select and combine risk controls, check out Part 3 of this blog series.
The entire sequence from causes to accident to consequences is called a risk pathway, and by using the bowtie diagram, we can quickly take in all of the details. By using bowties, we and our workforce can easily understand:
- the linkages between risk causes and the risk event, and between the risk event and subsequent risk impacts.
- a common understanding of how systems/processes work and their propensity to fail.
- what risk controls are in place.
- how those controls act to reduce risk, and why they are only as effective as the person/process verifying they will work when expected.
Benefits of Using Risk Bowties
In our discussion above we can easily see that one of the benefits of using risk bowties is that we can combine a great deal of information from different assessments into a single diagram. Here are some other major benefits of using risk bowties:
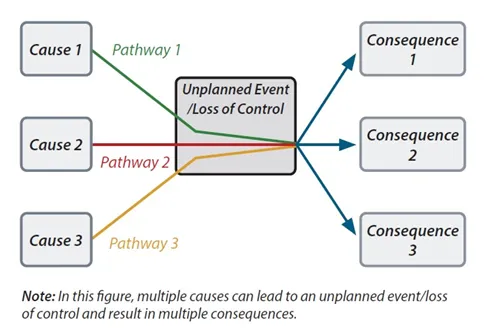
Accuracy. Using risk bowties can significantly improve the accuracy of risk management information that you and your team use. How do they do that? Let’s think about it this way: When we use a table for our risk data, we have to fit all the information about the causes of an unplanned event, the preventative controls present, the consequences of loss of control, and the mitigative controls in place into a tight space across one or two rows. The way we see that information can then lead to misunderstandings, influencing us to think about risk for an unplanned event in terms of simple, linear pathways: one cause, one accident, one consequence. Neither life nor risk pathways are usually that simple. Unplanned events rarely result from just one pathway, and rarely have just one consequence. This misunderstanding can potentially be dangerous, because it undermines our ability to prevent major workplace accidents, and it places our workforce and business at risk.
On the other hand, when we use risk bowties, we have an easier time understanding how multiple causes can lead to an accident, which then can result in multiple potential consequences. Look how easily a bowtie diagram conveys information about multiple causes and consequences in the figure below.
Easier Training: As we discussed above, there are many valid ways to do risk assessments, all of which have their specific strengths and limitations. But an overarching issue with both individual methods and combining several methods is that they don’t present risk information in a format that’s very useful as a training tool. They tend to be granular, tabular, and analytic. In other words, they don’t tell an easily understood story that helps employees quickly understand the risks and controls in their workplace.
But as the old saying goes, “a picture is worth a thousand words,” and a major strength of risk bowties is that they present an easy-to-use “map” of workplace risks. Our employees don’t have to hunt through multiple documents for the information they need to quickly understand the causes and consequences of risks and the important of the controls in place to prevent and mitigate workplace accidents.
Better Employee Engagement: Because bowties are easier to understand, they also promote better employee engagement in EHS risk management. Your workers will be able to see how unplanned events and potential consequences follow from various cases, and that will motivate them to more consciously avoid behaviors and workplace practices that can set such an event into motion. They’ll understand the reasons behind workplace safety policies and safe operating procedures (SOPs) and be more likely to model safe behavior. Another benefit is that the process of building and revising bowties provides great opportunities for employees to participate and share their own knowledge of workplace risks, which makes your safety programs more effective.
Adaptability: One of the challenges of EHS management is that safety is a moving target. You need to assess and control workplace risks, but your company’s operations and facets of the physical workplace itself are often changing, such as through introduction of new processes, new chemicals, and new configurations of workstations. Because risk bowties promote easier worker participation and better understanding, you’ll have an easier time updating your bowties as important details about your workplace and operations change. And if you learn that some of your existing information about risk pathways is inaccurate, or that controls aren’t working as planned and need replacement, you can quickly make the needed tweaks to your risk bowties and then use them to retrain your workers.
In short, risk bowties give you the simplicity, flexibility and visibility you need to improve your management of EHS risks.
Are Risk Bowties Hard to Use?
Not anymore, at least not if you have the right tools.
It used to be hard to do bowtie analysis, because much of the work had to be done either manually or using standard desktop computer applications to do things they were not specifically designed to do. And the information needed to make them was in so many different places, with no method available to easily unify the information or even to share it across different systems. That’s why many EHS professionals still mistakenly believe that bowties are just too hard to build and use—that they’re tools for someone else, not them.
Modern Operational Risk software has changed all of that. It democratizes risk management by making it easy for all companies and all EHS professionals to perform bowtie analysis. In fact, it’s as simple as hitting a “Generate Bowtie” button, and then watching as the software pulls information from your hazard studies and other risk assessments, analyzes it, maps tabular data into a bowtie, and displays the results.
Looking for More Information on Risk Bowties?
If you’d like more information about risk bowties, please check out the following resources in our library.
For a comprehensive overview of the many ways risk bowties help improve better risk management, download our guide Using Risk Bowties to Manage Risk, or watch our on-demand webinar Bowtie Analysis Tools: How Successful Companies Manage Risk.
If you’re just looking for a briefer overview that you can use to help build a case for your organization to start using risk bowties, our infographic Risk Bowties: A Tool for Risk Management and Training might be just what you need.
EHS managers who want to better understand how bowties combine information from many different kinds of risk assessments can download our interactive infographic Bowties: A Unified View of Operational Risk.
To learn more about a real-life accident that shows how risk bowties can help manage risk for complex processes with significant safety and health risks, be sure to check out our on-demand webinar Thunder River Rapids: A Case Study in Process Safety and Risk Management.
Finally, be sure to check back on this space for the final installment of this blog series, in which we’ll talk about how risk management is the glue that holds your entire EHS management system together.
Let VelocityEHS Help!
Our customers consistently report that our bowtie analysis capabilities have helped them achieve dramatic improvements to workplace productivity, knowledge sharing and risk management program performance.
And bowtie analysis is just one of many tools within the Operational Risk solution in our VelocityEHS Accelerate® Platform, along with qualitative and quantitative risk analysis, layers of protection analysis (LOPA), critical controls verification and much more!
Ready to see more? Visit our Operational Risk page to request a demo with one of our customer solutions consultants today, or contact us anytime to learn more about how we can support you on your EHS/ESG journey.